Designed by one of IMPACT Magazine’s Canada’s Top Trainers, Rebecca Garland of Elan Performance Inc.
This program is designed to:
- Strengthen and tone your core 360 degrees around!
- This includes your fabulous abs (yep, all four ab groups!), your beautiful back and under-appreciated buttocks (did you know you had 3 butt muscles?), as well as your luscious inner thighs (hello adductors), and strong (and getting stronger) shoulders.
- Lengthen and open the front of the hips and chest, which gets tight with prolonged sitting and can lead to back, neck and shoulder pain/dysfunction.
- Work not just core strength, but also core stability, and get you moving through a variety of functional planes of movement targeting your side lines, front line, back line and rotational lines.
- Caution: Before changing or undertaking any new fitness or strength program, seek physician advice.
- As always, listen your body. If something doesn’t feel right or causes any pain, ease off, modify, or skip the exercise.
Follow in sequence, repeating this circuit 2-3 times:
Warm Up:
- Marching on spot 20x: lift knees high and swing your arms
- Squats 15x – start with feet a little wider than shoulder width and feet slightly pointing outwards – engage your core to “brace” as you keep neutral spine throughout the movement – start with chest lifted and looking forward or slightly upwards (keep your gaze here as you lower into your squat – don’t look down) – as you lower, imagine spreading the floor with your feet, as though you were tearing it in half – on the way up, imagine picking a blueberry up with your kegel muscles (pelvic floor); on the way down, put it back down (do NOT make blueberry juice!) Option: do this from a chair.
(Repeat the above two exercises 3 times.)
Core Workout:
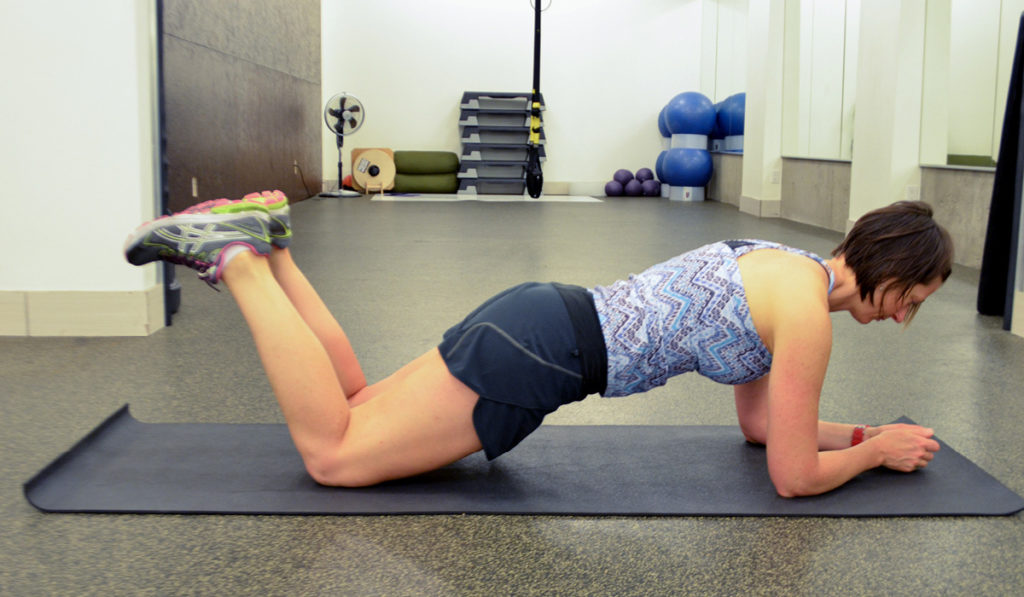
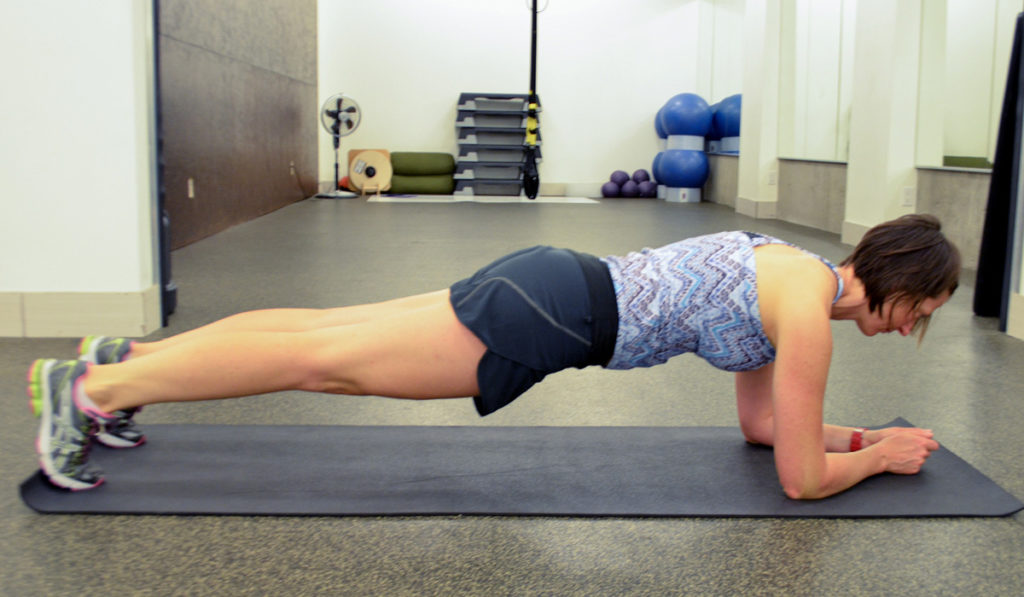
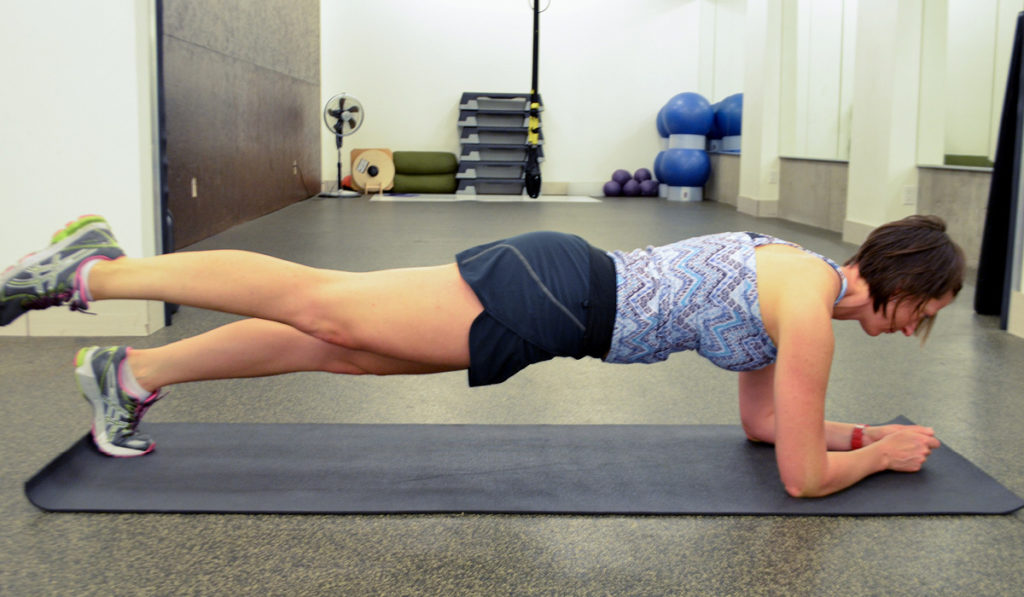
1. Front plank: hold 20-45 sec.
Directions:
- Maintain neutral pelvis and neutral spine by bracing through your core.
- If you feel your back arching or straining, re-adjust into a slight pelvic tilt and/or or drop to knees.
- Draw the back of your head up towards the sky to maintain your spinal/cervical alignment, and reach the crown of your head towards the wall in front of you. Think of lengthening through your entire body – from feet to crown of head.
- Press up through your arms pushing yourself away from the floor.
- Engage pelvic floor and hold this position.
- Continue breathing. Stop if you feel any back strain.
Level 1: Perform from the knees.
Level 2: Perform from feet.
Level 3: Single leg.
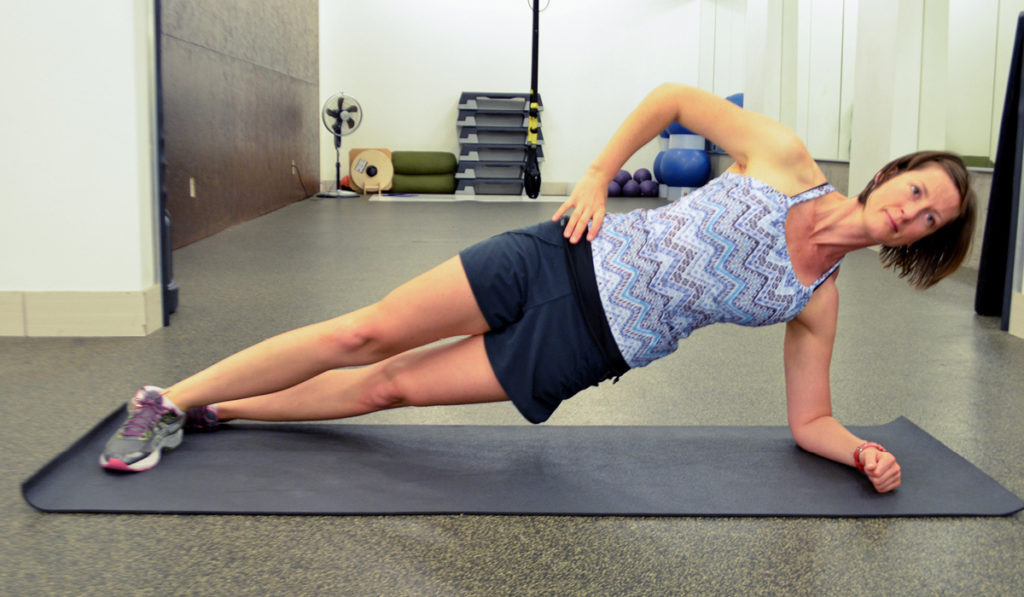
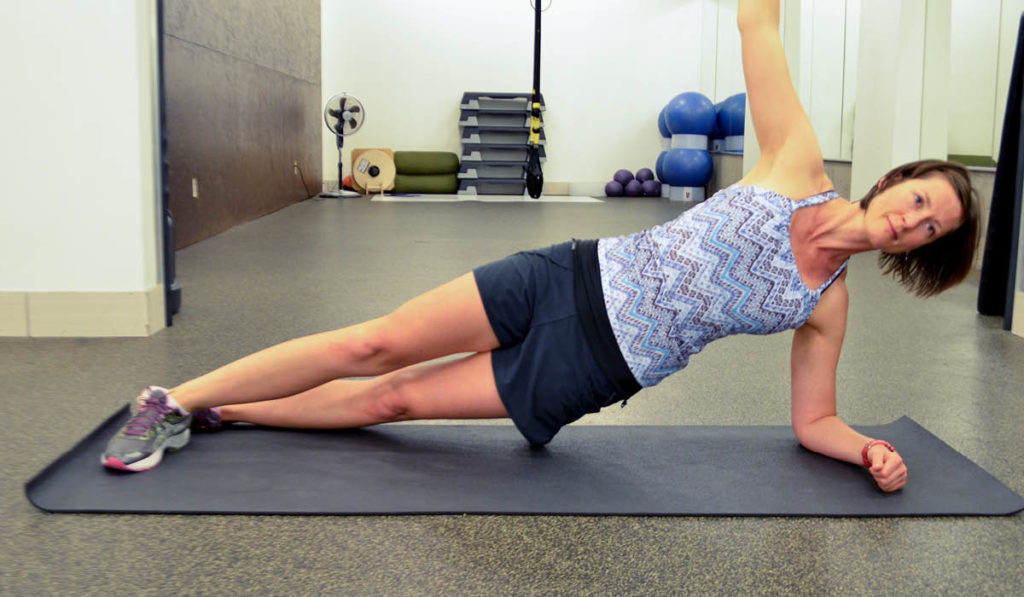
2. Side plank: hold 20-45 sec. per side
Directions:
- Imagine a straight line running along your mat or floor. Align feet (or bottom knee), hips, shoulders, and head along this line.
- Maintain neutral spine and pelvis. Draw into slight pelvic tilt so there is no arch through your back.
- Press up through arm away from floor.
- Engage pelvic floor and hold. Continue breathing.
Level 1: Perform from bottom knee and elbow (keep top leg straight and in line with rest of body.)
Level 2: Perform from both feet and either elbow or hand.
Challenge: Perform from bottom knee or foot, and lift top leg. Hold for duration of time.
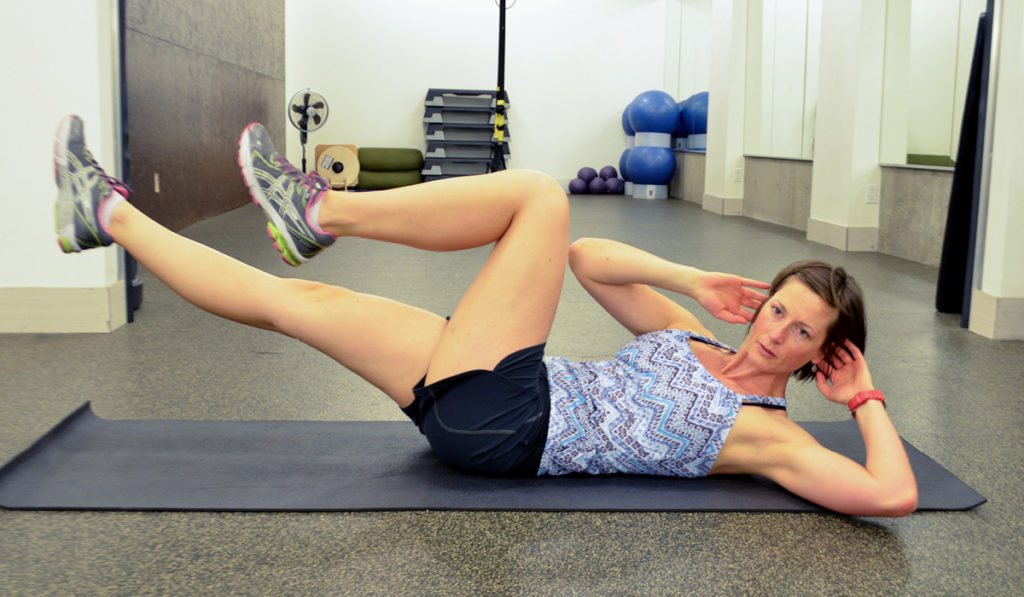
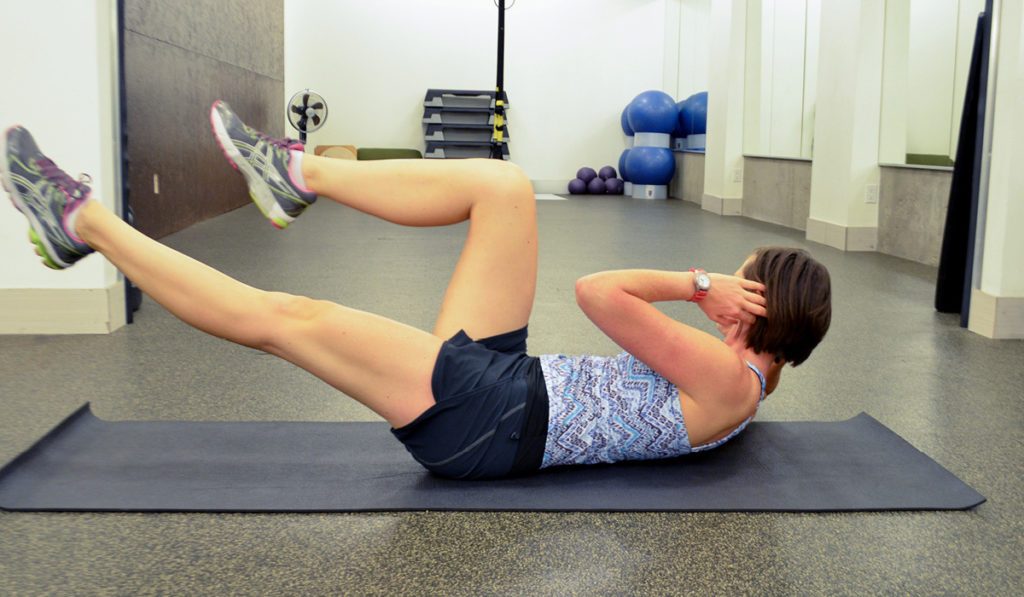
3. Bicycle Crunches: 20x slowly
Directions:
- Lie on back. Maintaining neutral spine, draw one leg into the air at a time and bend both knees to 90 degrees.
- Cradle head in hands keeping a fist distance between chin and chest (do not pull on neck).
- Use abdominals to draw lower ribs towards hips, lift shoulders, head and arms off the floor.
- Inhale to prepare, then exhale to rotate and close gap between shoulder and opposite hip. As you do so, draw that knee in and extend other leg at 45 degrees from floor. (Keep elbows open wide. Don’t aim to touch elbow to knee… go for shoulder to hip.)
- Focus on contracting abs inwards as you forcefully exhale (like ringing out a wet towel).
- Inhale back to center keeping shoulder blades and head off mat (again, do not pull on your neck!).
- Exhale to other side and repeat.
Tip: maintain neutral and stable (no rocking!) pelvis throughout this exercise.
*If you experience any back strain, keep extended leg higher towards ceiling, and pull bent knee in closer to chest. If still strained, then stop or take a break.
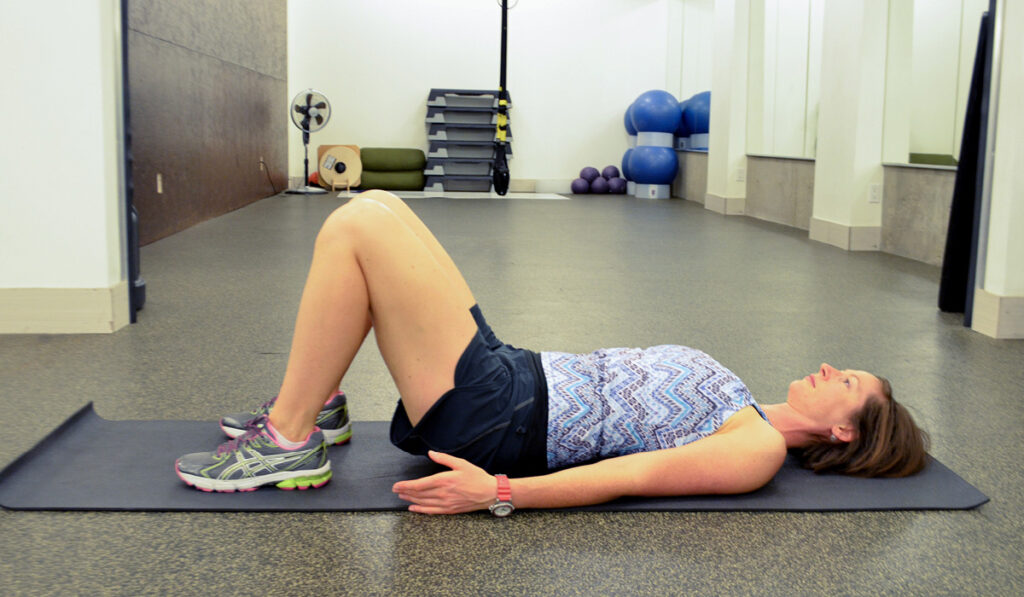
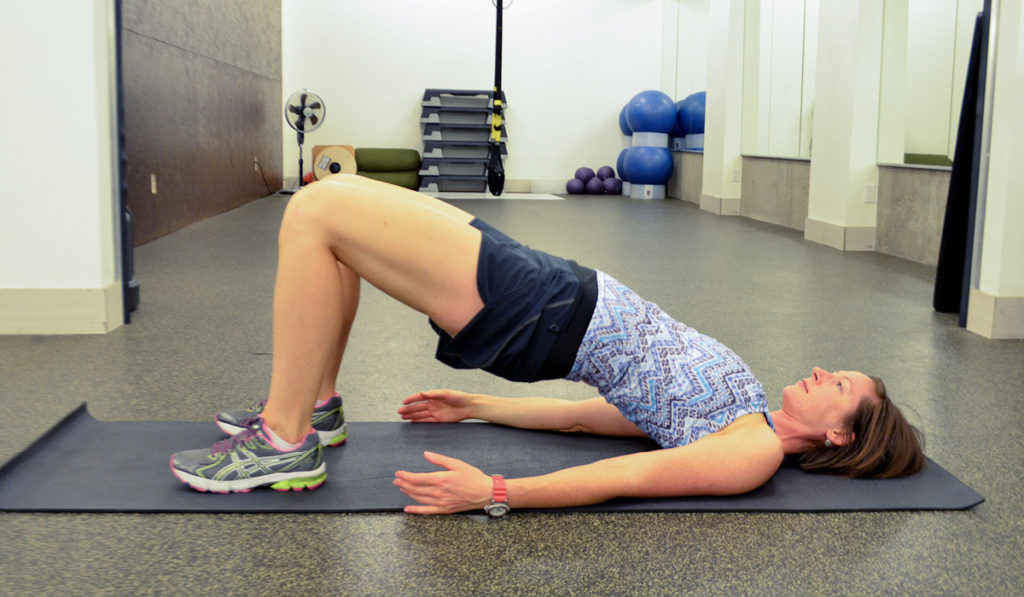
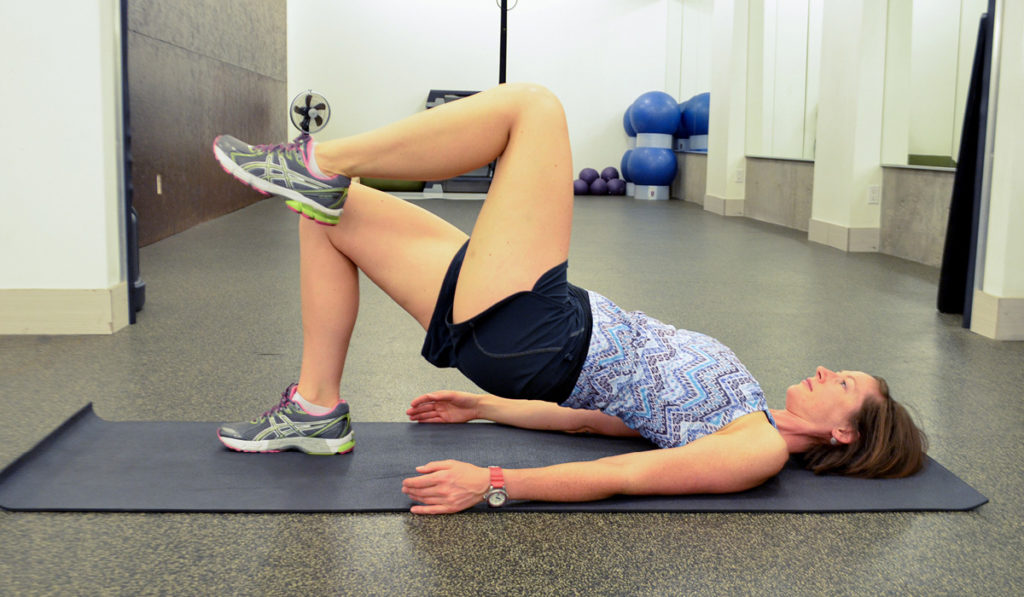
4. Hip lifts: 6x (add 5 knee-squeezes at the top of each lift)
Directions:
- Lie on back with neutral spine/pelvis, feet hip width apart.
- Place arms to sides palms up and gently press shoulder blades into mat to engage rhomboids and mid traps.
- Draw shoulder girdle down towards your hips. This engages lower traps and release upper traps (hold this position throughout exercise).
- Inhale to prepare, then exhale to press through heels and press hips up towards ceiling. (If you feel low back strain or arch, re-adjust into slight pelvic tilt so you feel more glutes and hamstrings).
- Adjust feet so they’re directly under the knees.
- Hold position as you squeeze knees together 5 times and working the adductors (inner thighs).
- Then inhale pelvis back to floor, lengthening and reaching out the tailbone. Barely touch the floor, then exhale hips back up & repeat.
Level 1: Double leg hip lift.
Level 2: Single alternating leg hip lifts (simulate a marching sequence). Work on keeping hips stable as you march and make your transitions.
Level 3: One side: single leg hip lifts 10x, then alternate to other leg.
Tips:
- Maintain neutral spine and neck throughout. Keep pelvic tilt at top, so you are not pressing up through low back.
- Only press up as high as your shoulder blades, not neck, so no extra pressure is on neck or head.
Double Leg Hip Lift Double Leg Hip Lift Single Leg Hip Lift
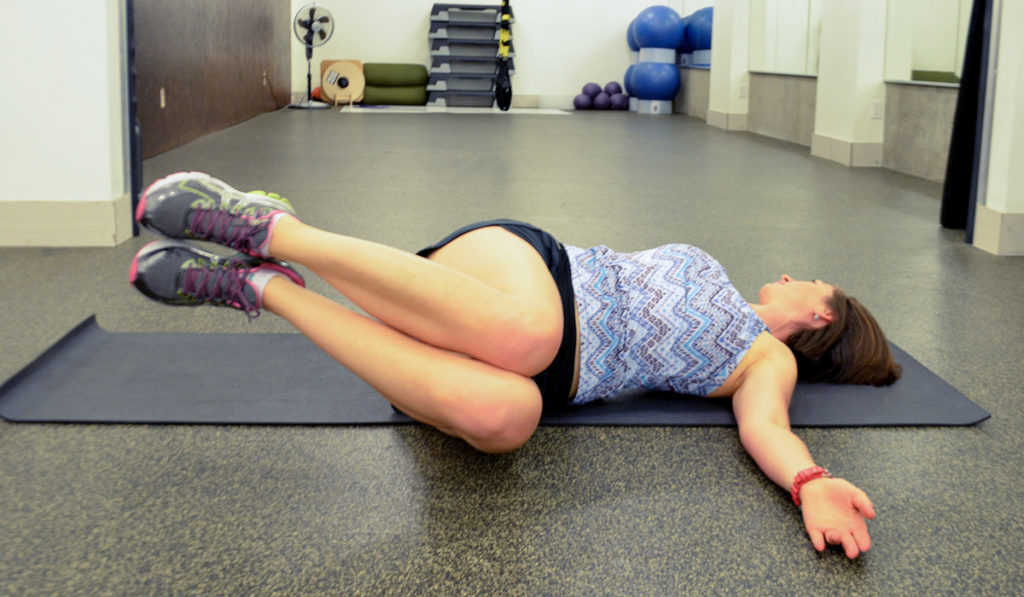
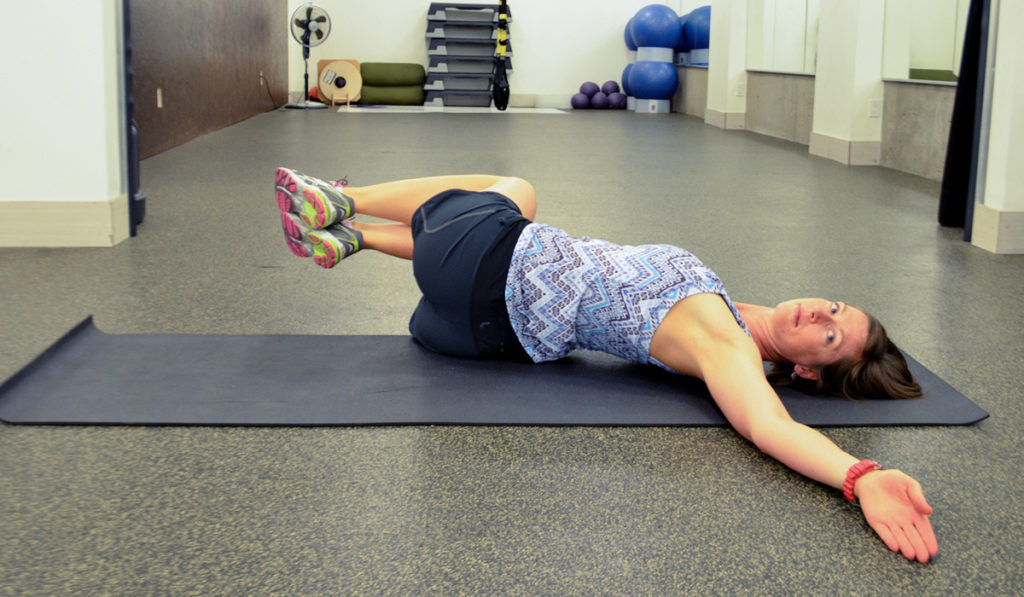
5. Knee sways: 8-12x (4-6 rotations per side)
Directions:
- Lie on back. Reach arms out to sides shoulder level.
- While maintaining neutral spine, lift one leg at a time into air with knees bent at 90 degrees. Press knees together and hold that inner thigh contraction throughout exercise. (If you like, place something between your knees like a Pilates ball or small pillow).
- Inhale and drop both legs over to one side – only as far as is comfortable and without touching floor.
- Exhale to engage abs and unwind spine back to neutral starting from the top and working way down to pelvis. (Imagine unwinding a rope from top to bottom).
- As this happens, the order is:
- ribcage will come back to the mat first
- pelvis second
- legs float to centre last
Tips:
- Focus on abs to unwind spine. Draw ribcage back to mat, then low back, then hips, then legs.
- If the exercise feels easy, you’re likely bringing your legs back to centre first, rather than core.
Modification: keep feet on floor
Challenge: straighten legs a little further away from body
6. Pushups: 10x
Directions:
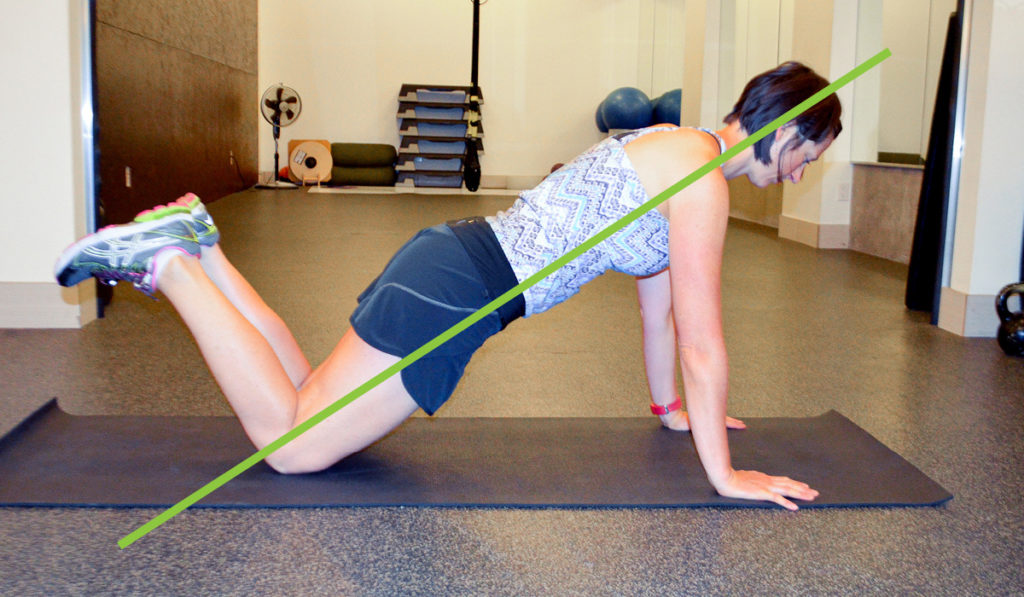
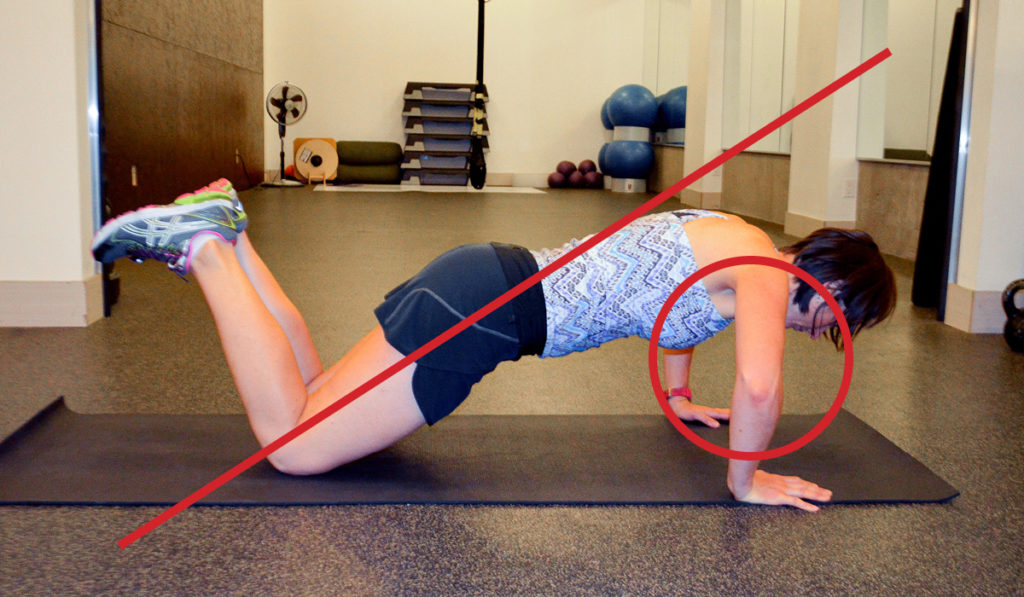
- Begin on hands and knees (or feet for greater intensity). – Form-check: Align ears, shoulders, hips and knees (or feet). Press up through shoulder blades and slide shoulders down from ears. Engage abs for strong core.
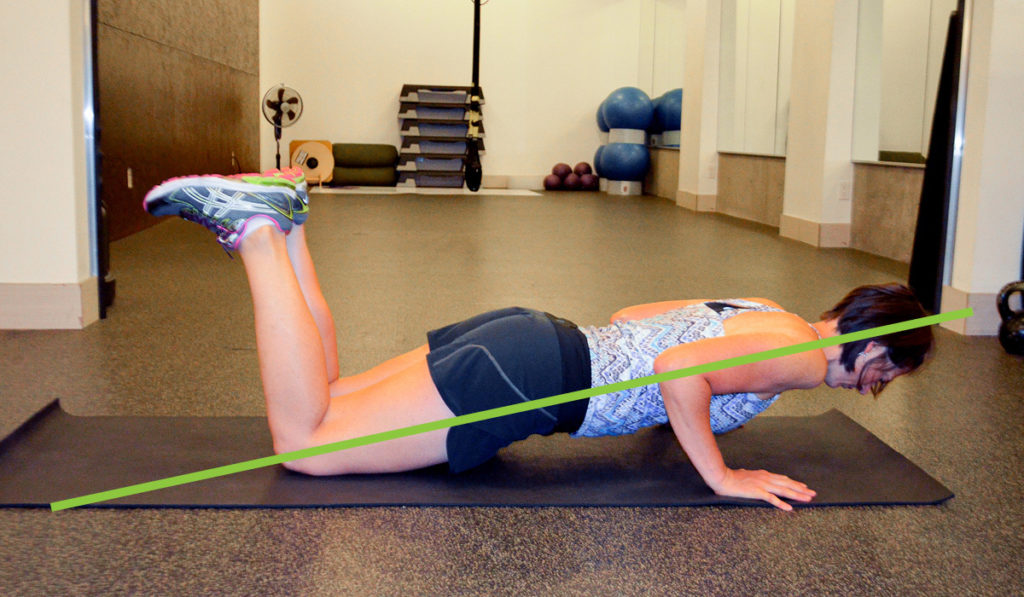
- Inhale to lower your chest (not face) towards the floor (keep neutral spine).
- Exhale to press back up reinforcing contraction through abs to protect back and maintain neutral position.
Tips:
To perform push ups correctly, keep head lifted (ears in line with shoulders, hips, knees/feet). – Draw into a slight pelvic tilt, lift your lower ribs in, and engage your abs to hold your spine in neutral.
Types:
- Narrow grip push-ups: Hands are placed under shoulders and elbows point backwards. Slide elbows along ribcage through full range of motion. These are often harder as they require more tricep strength.
- Wide grip push-ups: Walk hands slightly wider than shoulders so as you lower, the elbows remain in line with wrists. Go only to 80-90 degrees at elbow (or until upper arm is parallel to floor). These require less tricep strength and more chest strength.
Do: Align ears, shoulders, hips and knees. Hold that alignment throughout range of motion. If your triceps are not strong enough yet to keep elbows close to ribcage, perform wide grip push-ups, so elbows can stay in line with wrists.
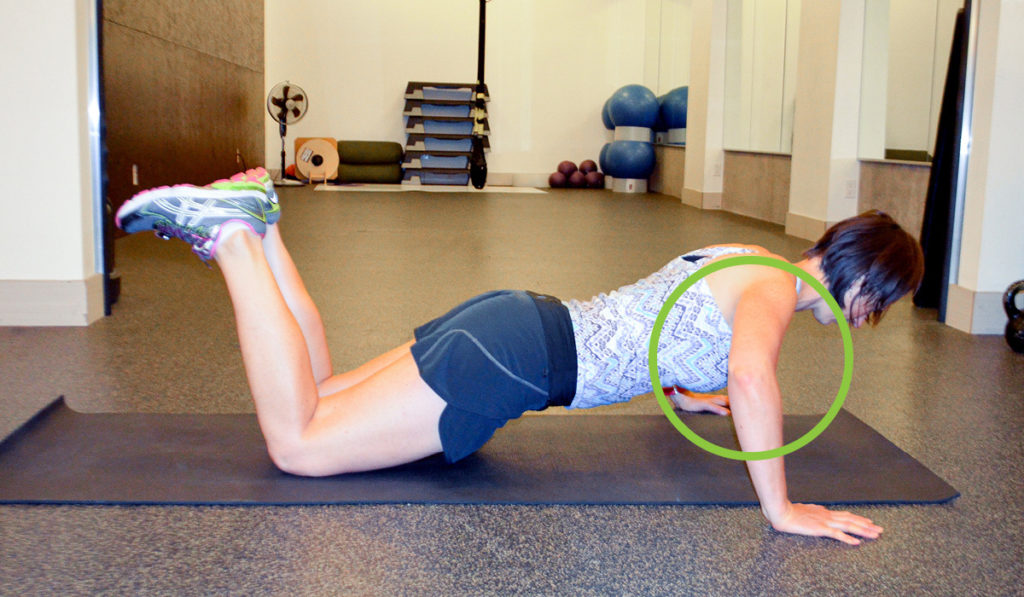
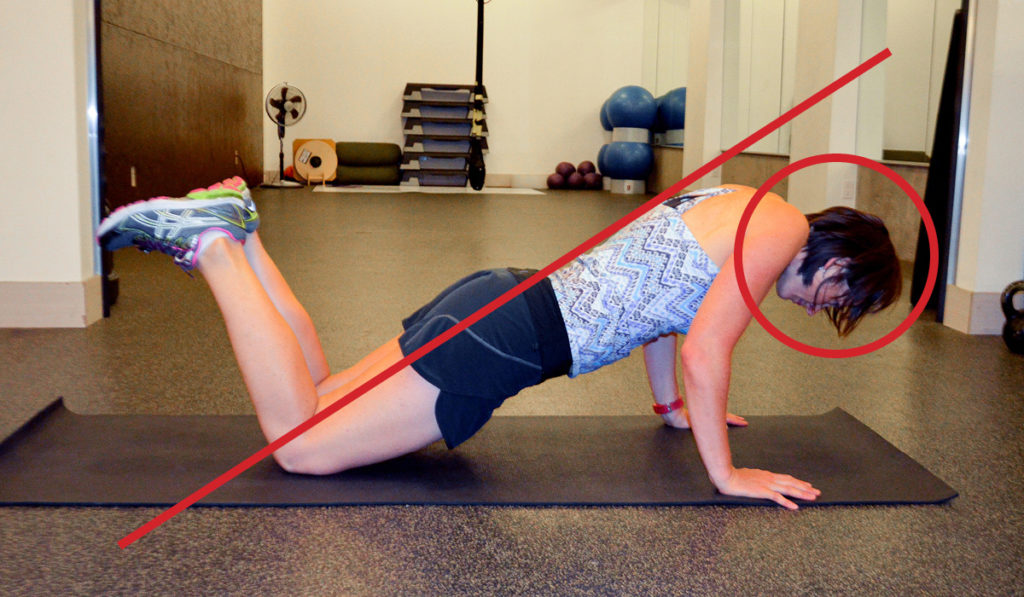
Don’t: Drop head. If you are and can’t adjust, perform push-ups off wall or bench. In these examples the hands are narrow, but head is dropping and elbows are going wide sacrificing core form and wrists. Don’t roll elbows to pinky side of hands!
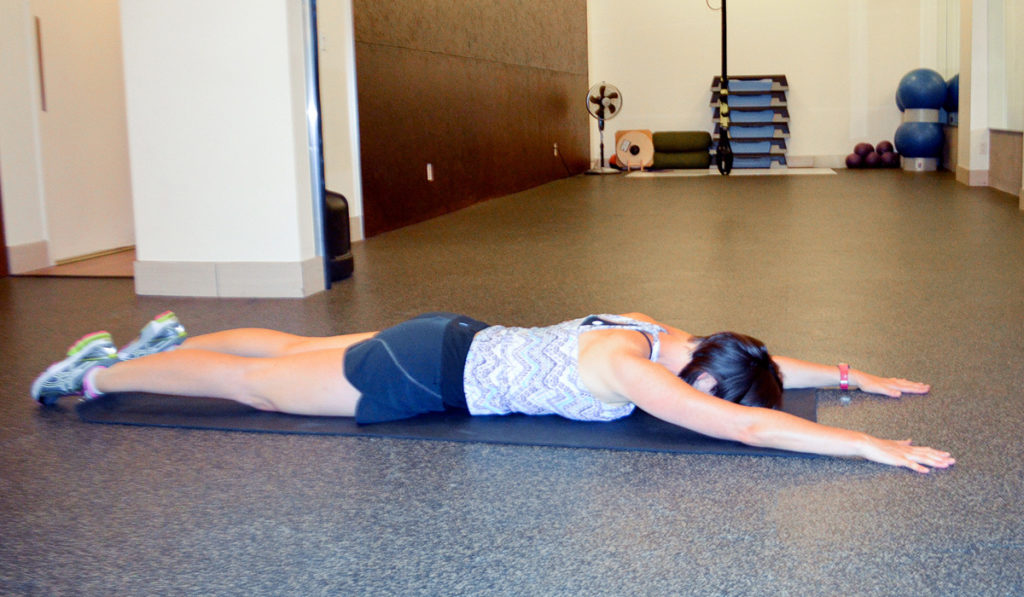
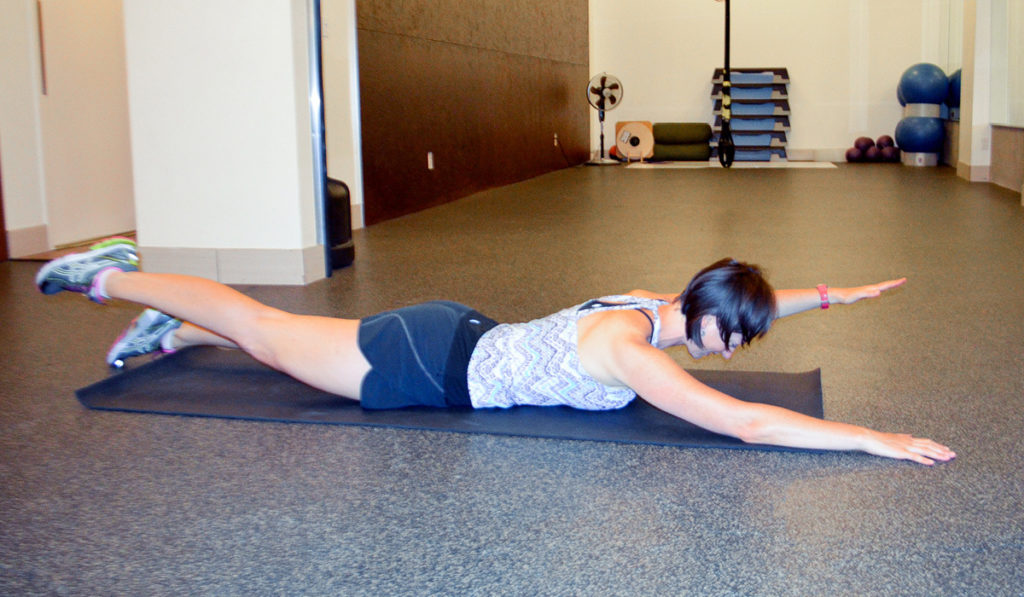
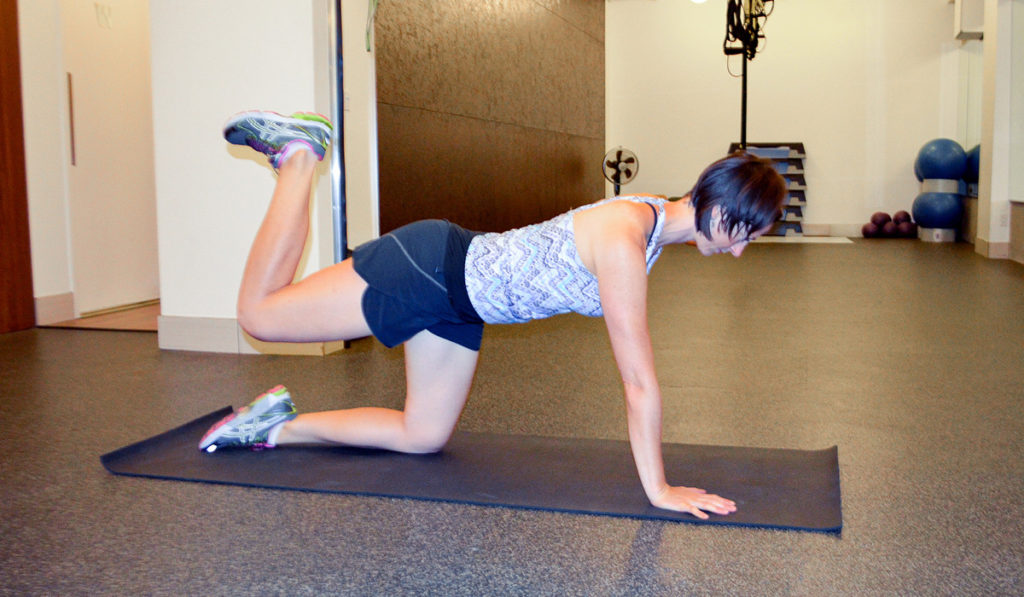
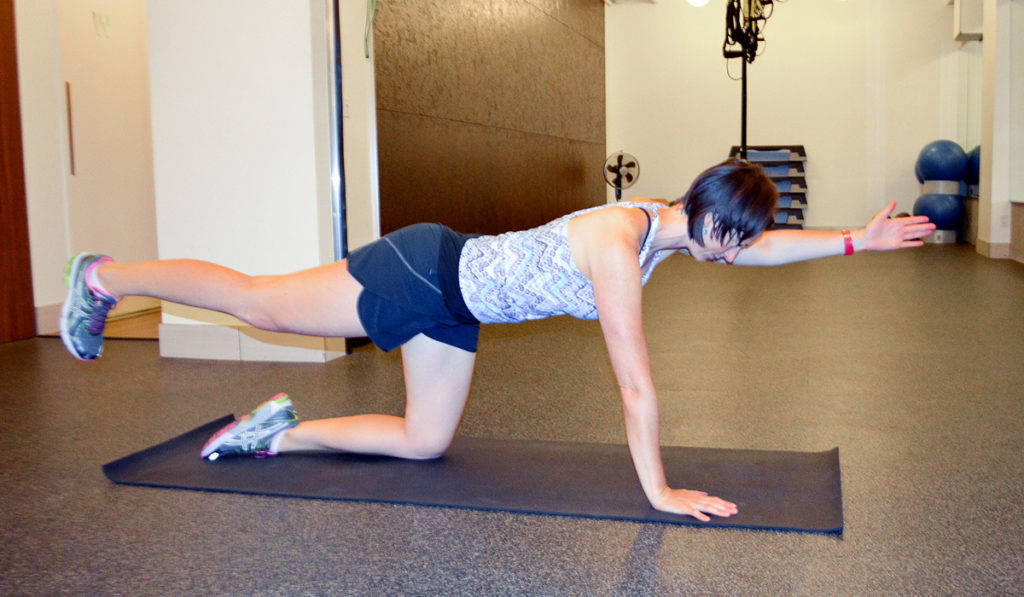
7. Superman: Repeat 8-10x each side
- Prepare: slide shoulders down, draw abs in engaging core, hover head (looking down so ears align with shoulders).
- Inhale to prepare then exhale to extend and then lift arm and opposite leg. Pause at top 3 seconds.
- Inhale to lower with control, maintaining stable pelvis (no rocking), and repeat on other side.
Challenge:
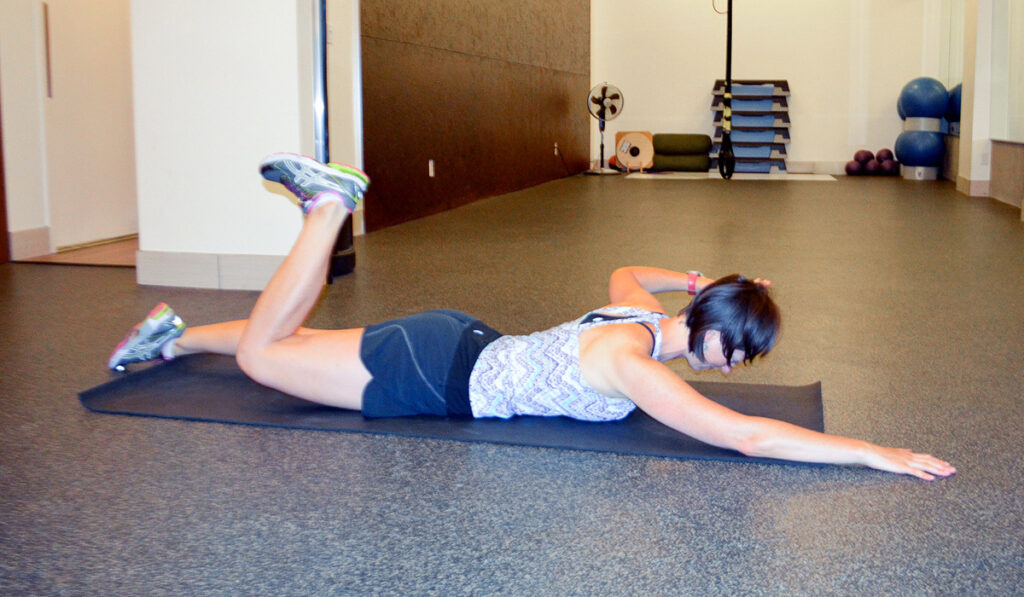
- Perform superman then follow with a single hamcurl and opposite arm lat pull-down. (Keep thigh and knee lifted off mat throughout the movement, and initiate lat-pull by sliding shoulder down your ribcage, followed by elbow.)
- Perform the above exercise from 4-pt kneeling position. Keep neutral spine and lower ribs lifted. Very often people sink through their low back in this position. You can prevent this by staying focused on your abs and pulling up through navel and bottom ribs.
Superman Challenge 1 Superman Challenge 2 Superman Challenge 2
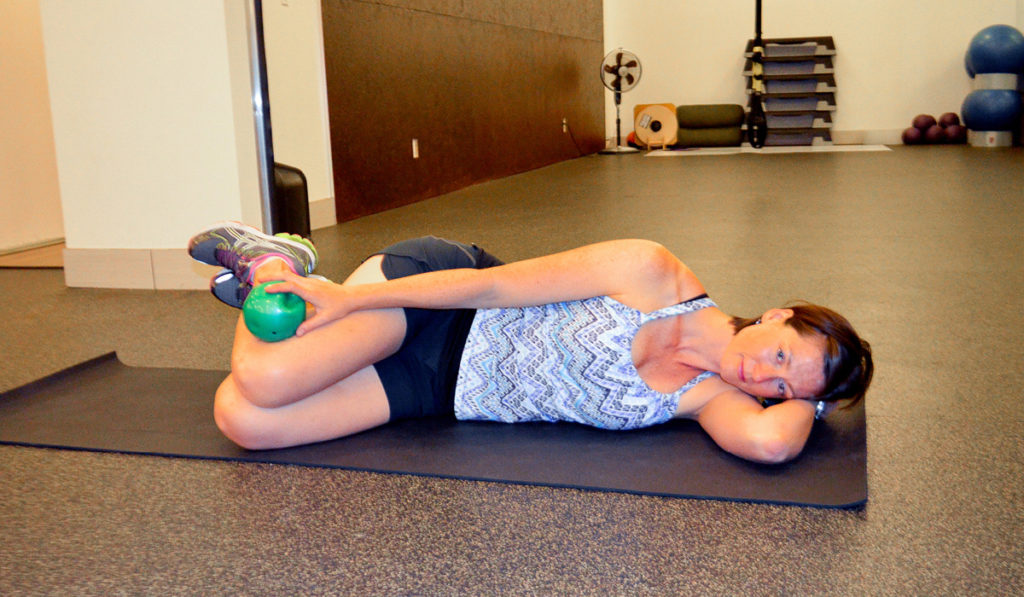
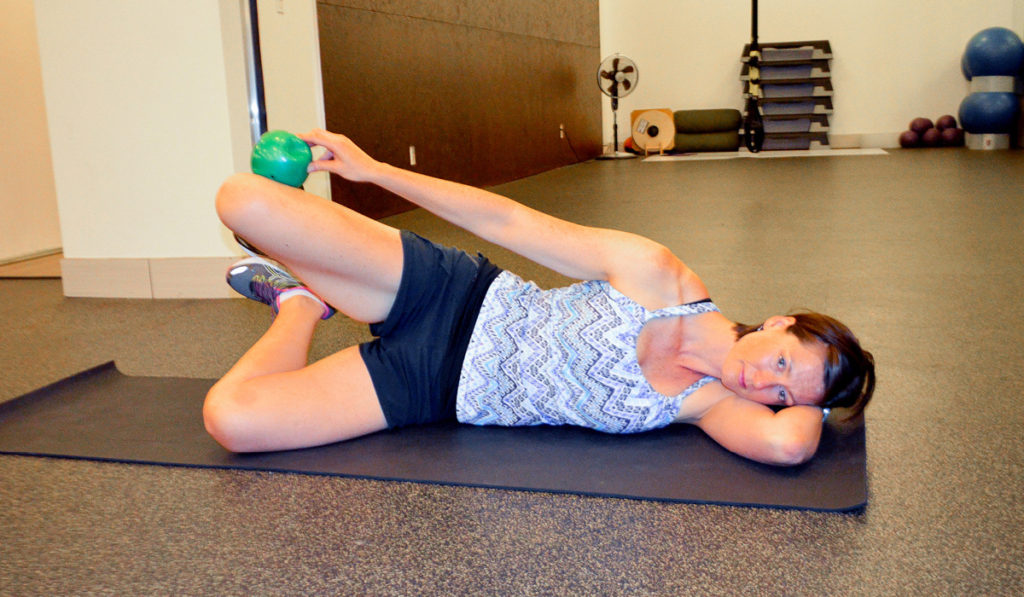
8. Clam shell: repeat 10-12x each side
- Form-check: establish neutral spine (do not curl forward), slide shoulders down, draw abs in engaging core. Draw knees forward so you can reach top knee with top hand. Then place top foot on bottom foot, and lift both off mat about top hip height.
- Maintain this position and foot connection throughout exercise.
- Inhale to prepare then exhale to open top knee up towards ceiling.
NOTE: If you have a band, you may place it around your knees. If not, you can add resistance by placing a weighted ball or even just your hand, on your top knee: press your knee down under resistance, then remove hand to open the knee back up. Repeat.
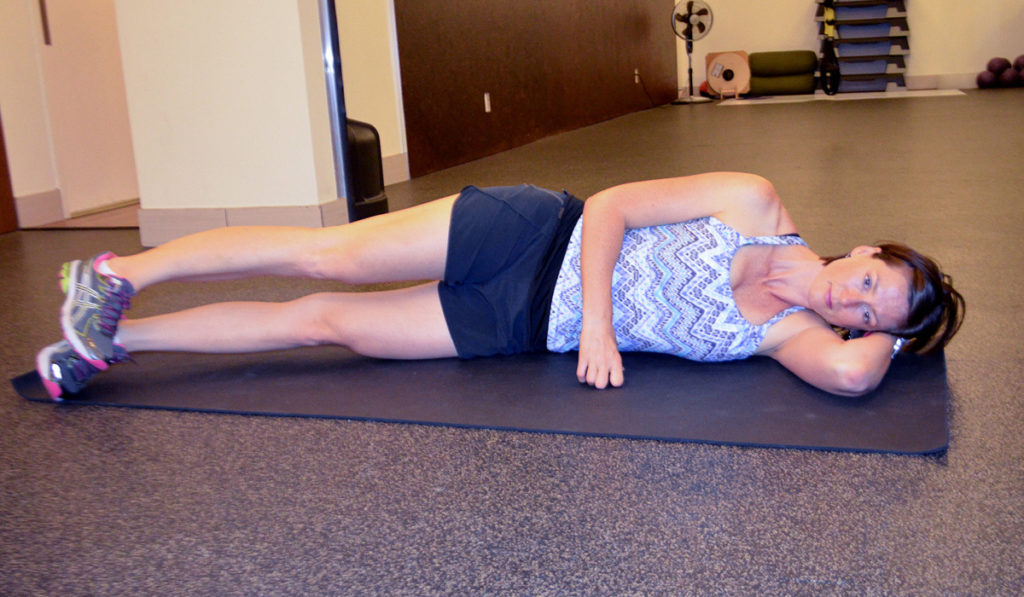
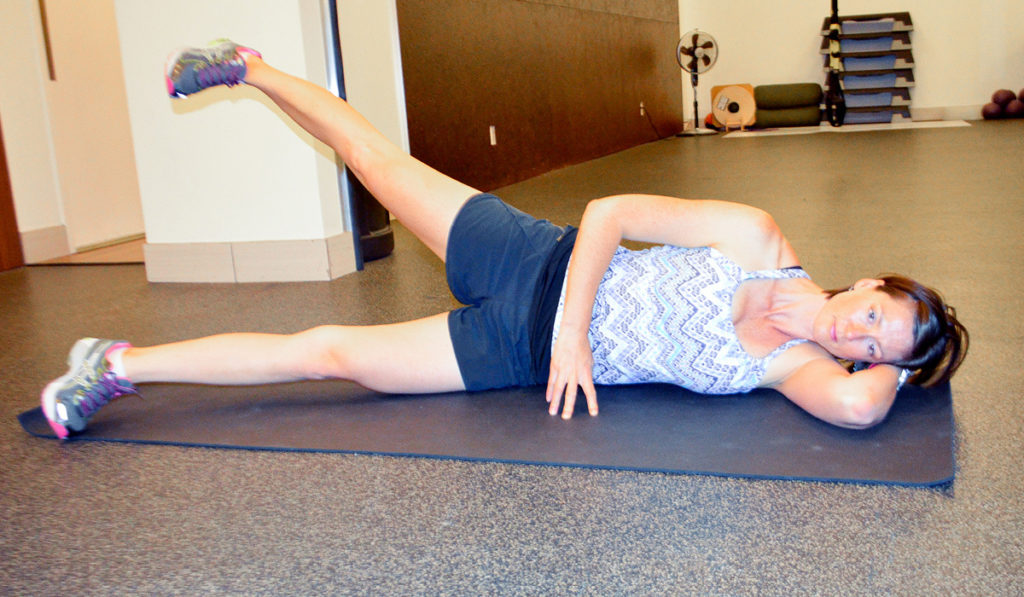
9 Side leg lifts: repeat 10-12x each side
- Form-check: slide shoulders down, draw abs in engaging core, lengthen spine (do not round forward), and bend bottom knee for added balance and stability (not shown in photo below)
- Start position:
- Begin by internally rotating out of the hip joint, so the knee points down.
- Start with toes touching floor 1-2 feet in front of you, then lift leg up and backwards at 45 degrees angle.
- Lift leg up and backwards at a 45 degrees angle back. Pause at the top for a moment or two to feel your glutes activate. (Your final position will have your leg lifted, foot in line with your body, or even slightly behind you, and your knee/toes still pointing downwards.
- Repeat.
Tip: Keep core engaged so your top hip stays in place and doesn’t shift forward.
COOL DOWN & STRETCH:
In each stretch:
Intensity should be 5-7/10. The stretch should feel gentle and NOT cause pain. Hold for 45-60 seconds on EACH side. Think of lengthening. Keep neutral spine. Breathe through it.
- Corkscrew: stretch for hips, spine, chest and shoulders.
- Figure-4 stretch: stretch for glute med.
- Seated twist: stretch for hips and spine.
- Lunge (lunge stretch reaching one arm up and over): stretch for hip flexors, intercostals and lats.
- Hamstrings
- Doorway and Roller stretch: stretch for chest and shoulders to support healthy posture.
- Doorway: place both arms in open doorway and lean into it.
- Roller: lie vertically on foam roller with arms out to sides and elbows at 90 degrees. Just relax into stretch allowing gravity to do its’ thing.
CONGRATULATIONS ON COMPLETING THE CORE QUICKIES!

